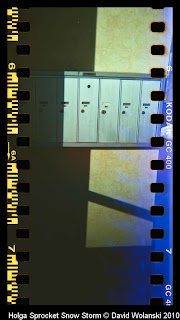
I've been doing some fun stuff with shooting 35 mm film in my Holga. The Holga is designed to shoot with medium format film, which is 60 mm x 60mm, about 2.5 times the area of 35mm film. This simple mod is being done by lots of folks across the net to use cheaper film that's easier and to get developed. Plus you get the cool sprocket effects, if you want.
To set the camera up, I put the 35 mm film in the standard location and used some heavy foam to hold the film in place, some above and below the cartridge, more or less centering it in the well.
Here's a photo of the camera with the foam in place, one back that's been taped for light leaks and another that is factory stock. More on the taping later.

I pulled the film across the camera and put the tab into the 120 roll, then used a small piece of gaffer tape to secure the film to the take up roll, then wound a little onto the spool to make sure the tape was holding. Masking or just clear tape would work fine, I assume.
Ready to pull the film across, note the standard spool with tape waiting for the film.

Pulled across, and just barely taped. The film is in the slot, just like you do with the 120 film.

Pulled across, then the take up roll is wound till I'm sure the tape will hold it to the spool

Then, I put the back on the camera.

You need to block off the red window on the back, as the 35mm film doesn't have the paper back to protect the unexposed film that is on the 120 film. For the first batch, I used black tape alone. It wasn't enough to keep a light leak from appearing in most shot, that showed up as a reddish square in the center of the exposed image. For the second round, I used a small piece of tinfoil and some gaffer tape. Masking tape will do instead of gaffer tape if you don't have it.
Other folks seal the camera for light leaks, I didn't bother. I noticed more light leaks when I used the camera in portrait mode.
Once the camera is sealed to light leaks as much as you want, wind enough film onto the takeup spool to get past the film that was exposed in loading the camera. I think this is about two whole turns of the take up spool. Close enough. Take your first photo, then advance the film, the same as you do with the 120. But wait! There's no number on the back of the film! Even if there was, you couldn't see it under the tape and foil.
Luckily, there are click charts on the interwebs that will tell you how many clicks to go to get the maximum amount of film use. Or you can be lazy like me. Turn the take up spool 1 and a half turns to advance to the next shot. When you get the film back you'll see there is less space in the early shots between each other than at the end. This makes for a little hassle in the scanning, but not much. The click charts will give you more consistent spacing. It's your call. I might start winding 1 and three quarter turn for the first few shots, then 1 and a half. Eventually you will find that the film gives a lot of resistance to advancing when you wind the take up reel. Don't force it to wind up. You have reached the end of the roll. Using what I did, that seems to be about 12-14 pics on a 24 shot roll.
The hardest part of doing the 35mm shots is to get the film out of the camera once you've used up the roll. There is no rewind button to get the film back in the canister to take it for developing! You need to use a dark bag, or be in a totally dark room. So far I've rewound the film onto the spool in a bathroom at work, in the attic in my house at night, and under a jacket in my lap in the car. The jacket was hardest. To rewind the film, find a spot you can make dark and not freak out. Once it's dark or your camera is in a light free place, take the back of the camera off and set it aside. Now you need to pop the 120 spool out of the camera along with the 35mm cartridge. Try not to touch the film as you wind it back into the 35mm canister by winding the tube on the end of the cannister. Just wind it all in there till you can tell you're not winding any more film into the canister. Now you can get some light and take the tape off the 120 spool and pick up the foam if it fell out.
Do what you're going to do to develop the film. If you're taking it to a lab, make sure they know not to cut the negatives! These are not standard negatives, they are probably irregularly spaced and too long anyways. If you have them give you prints, they won't be able to do them as standard prints. I've let them print them, then end up piecing the resulting prints together like a puzzle. They can't print them at a standard lab and let you see the sprockets as part of your print. If they scan them at a regular lab, you'll have the same non-standard size issues too.
For my first roll, I let them do the scans to see what they would come up with. Now I just have them develop and print for ~ $2 dollars a roll. I might just have them develop alone next time. I understand some places do that, some don't.
Things I keep in mind while shooting with the 35mm film in the Holga: The viewfinder is not a true representation of what will be exposed on the film. It's square and only so so for the 120 film. The 35mm film is rectangular and goes more or less across the center of the film expsosure area. I visualize losing some from the top and bottom of the square view finder to imagine where the film will record. Since you're rectangular, not square, you can use the camera more or less like a regular 35mm. Now you can do portrait and landscape again, you just have to accept some randomness in what you actually get on film. You might need to more or less center the most important part of the image if you want to be sure to get it on film!
Advantages to 35mm in the Holga: Film is cheaper and easier to get developed than the medium format. You get the cool sprockets.
Disadvantages It's a little more random than the 120 and it's a bigger pain to get the film out of the camera, you also lose some film space. Each shot on the medium format film has about 2.5 times the area of the 35mm.
Possible next steps: I've seen some things online about using bulk 35mm film rolls, Popsicle sticks, and an unused 120 spool to make wind the film into a container for easier unloading. Essentially you're winding the roll into the container as you shoot.
Folks, give this a try if you have a Holga. It's a lot of fun! If you do try it, let me know how you did!


